
Windows 11 features a lot of new additions compared to Windows 10, from customizable widgets to Android applications. But, did you know that it also includes several unique features that you may not be aware of? Windows 11 has tons of new features to make your day productive and interesting.
Here, we take a peek at the best-hidden features of Windows 11 that you shouldn’t miss.
Content
Dynamic Refresh Rate
The Dynamic Refresh Rate on Windows 11 lets you choose between different refresh rates depending on the level of activity on your system. DRR will not only help your battery last longer, but it will also help boost the performance of your Windows 11 PC.
For example, if you’re working on an office document, your screen can easily maintain a 60 Hz refresh rate to conserve power. But if you’re immersed in something energy-intensive, such as playing some Triple-A titles or video editing, your screen will automatically adjust to the maximum refresh rate supported to provide the best possible performance.
Before jumping into enabling dynamic refresh rates in Windows 11, make sure your PC is compatible with the option.
DRR compatibility requirements:
- Variable Refresh Rates (VRS) must be supported by the computer display.
- Your system display needs to have a refresh rate greater than 120 Hz.
- Your Windows display driver version must be up-to-date (WDD 3.0).
To verify that, launch the Run command, press Windows Key+ R and type ‘dxdiag‘, then press Enter. The DirectX Diagnostic Tool window will pop up. Switch to the Display tab. This will display information regarding the current device driver. Look for the model next to ‘Driver Model‘ on the right side. It has to be WDDM 3.0.
Follow the below steps to enable Dynamic Refresh Rate on Windows 11 PC.

- Open the Settings app from the Start menu on your Windows 11 PC.
- Go to System > Apps.
- From the right panel, select Display > Advanced Display.
- Click on ‘Choose a refresh rate‘, then select “Dynamic (60Hz or 120Hz).”
Related: How to Change Monitor Refresh Rate in Windows
Enable HDR Visuals for Any Game
Xbox Series X & S consoles came along with an Auto HDR function, which allowed backward-compatible games to automatically upgrade to HDR to take advantage of this stunning display tech. If you are a PC gamer, Windows 11 enabled you to get stunning HDR visuals on any game.
With the Windows 11 Auto HDR intensity sliders, you can control how vibrant the colors in your games are. If you’re playing a game with exceptionally bright or dark colors, you can adjust the brightness slider to your taste so that you can get the best HDR gaming experience.
To get the best high dynamic range (HDR) experience, make sure your monitor supports HDR10. To enable Auto HDR for games on your computer;
- Open the Settings app, then navigate to System > Display.
- Scroll down and enable Use HDR.
- Now, go to Auto HDR and switch it on.
Besides, you can also enable the Auto HDR from the Game Bar on your Windows 11 PC. Follow the below steps to get Auto HDR for games from the Xbox Game Bar on your PC;
- Launch Xbox Game Bar by pressing Windows Key + G on your keyboard.
- Open the Settings from your Xbox Game Bar dialog box.
- Now, choose Gaming features from the left panel.
- You can see options like Auto HDR and Use Auto HDR with supported games.
- Tick the checkboxes right next to the options and you’re done.
- Restart your PC to save your changes.
You’ll need an Xbox Game Bar version later than 5.721 to use Auto HDR. The most recent version of Xbox Game Bar is available for download from the Microsoft Store.
Related: How to Calibrate Display for HDR Content in Windows 11
Get Windows File Explorer Tabs
Tabs are the best things ever made for multitaskers. Browser tabs make it easier to navigate through multiple websites just by switching between them. You must have wanted the same on Windows File Explorer. File Explorer tabs are one of the most awaited features by Windows users and it is almost here.
The File Explorer tab feature has yet to be formally announced by Microsoft, and it is currently only available in the latest developer builds of Windows 11. You can get the File Explorer tabs by installing the Windows 11 Dev Channel Beta.
Alternatively, there are third-party apps that help you get the File Explorer tabs on Windows 10 or 11. “Files App” is one such neatly designed file explorer alternative with many features including tabs and tags.
Related: How to Add Google Drive to File Explorer in Windows 10
New Fluent Style Emojis and Stickers
Windows 11 comes with 1500+ expressive 2D emojis that you can use in your daily interactions. Microsoft named these 2D graphics ‘Fluent Style’ emojis. It also includes the clever MS Office assistant ‘Clippy,’ a popular animated figure from Microsoft’s bygone era who has been resurrected in Windows 11.
Among the specific changes are Reactions in chat, channels, and live meeting reactions that will all be updated to the new Fluent style, along with some fun animations for certain emojis.
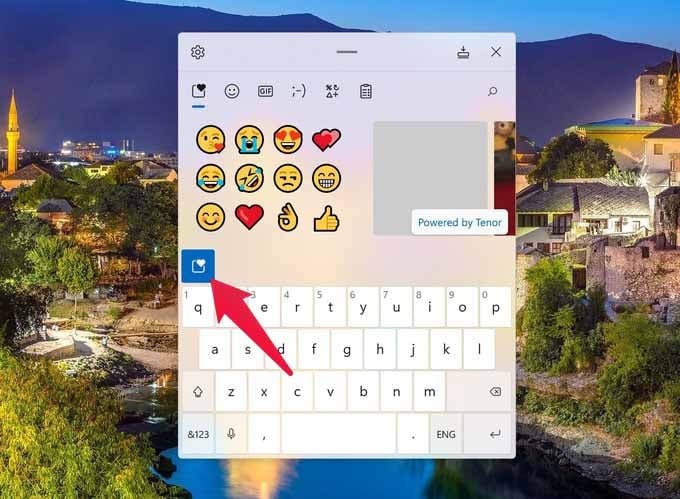
To get the Fluent style emojis on Windows 11, make sure the OS version is 22000.346 or later from Windows Update. If you have the supported Windows version, press the Windows key + period (.) key to open the emoji picker and you’re good to go.
Related: How to Use Emojis in Any App on Windows 11 PC
High Contrast Theme
Microsoft came up with the new Accessibility Settings to make it simpler for you to customize your computer to your specific needs. Contrast Themes were added to Windows 11 to improve accessibility for those with limited eyesight. If you’re light-sensitive or spend a lot of time in front of a screen, the new Dark and Contrast themes in Windows 11 might help you lower screen brightness and boost contrast.
To enable the Contrast Themes;
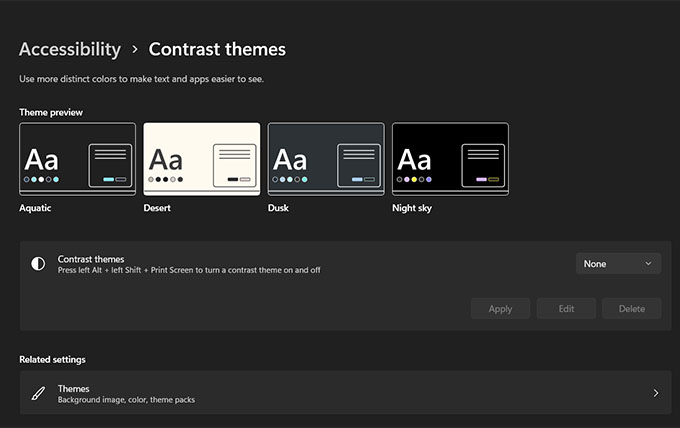
- Go to Start > Settings > Accessibility > Contrast themes from your Windows 11 PC.
- Scroll down to Contrast themes, choose your suitable theme from the dropdown menu, then click on Apply.
- To disable the Contrast Themes, select ‘None’ from the dropdown menu and click on Apply. This will restore the display to its original settings.
To quickly switch contrast mode on or off, use the left Alt key + left Shift key + Print screen.
Related: Windows 11 Looks Boring? Customize Windows 11 Theme Now
Smart App Control
In addition to the new Accessibility features, Windows 11 also comes with lots of new Security features. Smart App Control promises to provide significant malware protection, including emerging threats, by preventing harmful or untrustworthy apps from being installed. It will also help in blocking potentially harmful apps that may end up slowing down your PC, displaying unexpected adverts, and a lot of others.
To access Smart App Control settings;
Navigate to Windows Security > App & browser control > Smart App Control from Windows Settings.
You can keep it on ‘On,’ ‘Off,’ or ‘Evaluate’ (automatically switches off and on without getting in your way) modes.
Related: How to Install Android Apps on Windows 11 Right Now
Run Focus Sessions During Work Hours
Microsoft came up with the new Focus Sessions feature (an upgrade to the Focus Assist in Windows 10) with the goal of focusing on digital health. This includes a Focus Timer as well as Microsoft To-Do and Spotify integration. It also has a function called Daily Goals that will keep you from breaking your streak.
To start a Focus Session on Windows 11 PC;
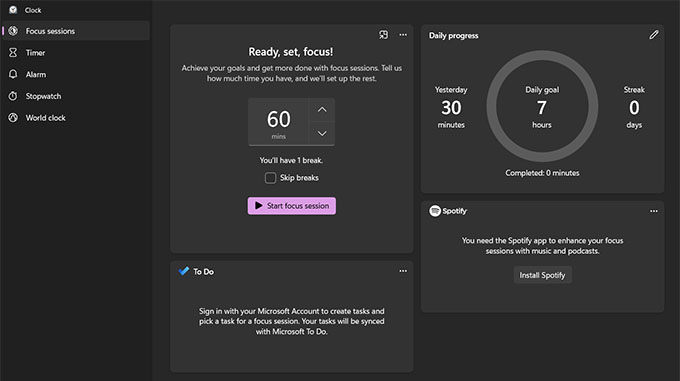
- Search and open the Clock app on Windows 11 PC.
- Select “Focus sessions” from the left pane.
- Set focus timer from the window and select “Start focus session.”
You can set daily goals, duration, and break sessions from the clock app itself. Also, there’s a floating timer that lets you see your progress while working.
Related: How to Enable and Use Windows 11 Stickers Right Now
Easily Scroll Up or Down Any Window
When you have two windows side by side and you are active on only one, scrolling on the other window is easy with Windows 11. You do not have to click on the other window to scroll up or down using the mouse.
Simply move your cursor over any open window and start scrolling with the mouse. It lets you save on a few clicks and eliminates the need to adjust focus frequently. You can enable or disable this feature. To turn on Inactive Scrolling on Windows 11 computers;
- Open Windows Settings.
- Go to Bluetooth & Devices > Mouse.
- Now on the Mouse window, switch on the toggle next to “Scroll inactive windows while hovering over them.”
Alternatively, hold down Win+R, type Regedit, and press Enter. Scroll down to Computer > HKEY_CURRENT_USER > Control Panel > Desktop.
Now, from the right panel, scroll down to ‘MouseWheelRouting‘ and set its value to 0. To save your changes, click OK. To save the modifications, restart your computer.
Link Your Phone with PC
Microsoft has renamed Your Phone app as Phone Link in Windows 11. The new Phone Link app lets you access 2000 photos taken by your Android phone’s camera roll on your computer. You can also use the Phone Link app to answer calls from your phone on your PC.
To share movies and data across devices, you don’t need to use email. Simply copy and paste from your Android device to your PC. To enable this feature, go to the Phone Link app and then choose Settings > Cross-device copy & paste. Make sure the ‘Allow this app to access and transmit content I copy and paste between my phone and PC’ option is turned on.
Related: Desktop Icons Missing? Here’s How to Restore Desktop Icons on Windows 11
Compress Data Before Network Sharing
Compressing files before sharing over the network is now easier with the SMB compression on Windows 11. This eliminates the need to manually deflate a file, copy it, and then inflate it on the target device.
SMB compression is best used on networks with low bandwidth, such as a 1Gbps wireless network. If you’re transferring files over a 100 Gbps connection between servers with SSDs, enabling SMB compression will likely speed up the transfer time by some amount but won’t necessarily improve performance for other applications.
To always enable file compression for clients, you can use Windows Admin Center:
- Install Windows Admin Center and connect a client computer to a Windows Server 2022 server.
- Click on Files and file sharing from the left pane.
- Now, switch to the File shares tab.
- Here, you can either create a new share or make changes to an existing one. Check the box next to Compress data in the right pane, then click Edit.
With these hidden features and tools on Windows 11, you can get the most out of the new upgrade and get a productive and enjoyable Windows experience.