
There is a handful of features on Mac that lets you edit documents and images. Among them, the Preview app on macOS lets you add markups and sketches on top of the PDF files or other documents. Drawing on images and documents using the trackpad might not be as accurate as you do on the touch screen, which is obvious. What if you can draw the markups and edit PDF on Mac using your iPhone and iPad?
In this article, you will learn how to use your iPhone and iPad to edit a PDF or any files on Mac.
Content
- Use Continuity Markup on Mac to Draw Using iPhone or iPad
- Use Continuity Sketch to Draw on Mac Using iPad
- Add Signature to Documents on Mac Using iPhone or iPad
Use Continuity Markup on Mac to Draw on PDF Using iPhone or iPad
Apple’s continuity features across the devices including Mac and iPhone make it easier for the devices to communicate with each other. The continuity features support instant file transfer to editing files remotely between your Mac and iPhone or iPad. Similarly, your Mac has a feature named Continuity Markup that allows you to add graphics and drawings to the documents and PDFs on your Mac. You can instantly draw on PDF using your iPhone or iPad with this feature.
Here is how to edit PDF on Mac and draw over it using your iPhone or iPad screen.
![]()
- Make sure both your Mac and iPhone/iPad are using the same Apple ID and iCloud account.
- Connect both Mac and iPhone or iPad to the same Wi-Fi network, enable Bluetooth discovery.
- Now, from your Mac, click on the PDF file you want to edit and add drawing using your iPhone or iPad.
- Tap spacebar to open the file in Preview on Mac.
- Click on the Markup tool icon on top.
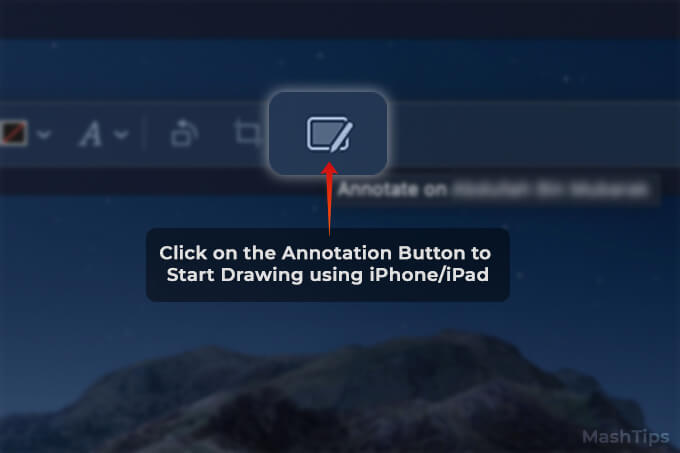
- Now Click the Continuity Annotation button (iPad with Apple Pencil icon).
- You will instantly find the annotation window on your iPhone or iPad that lets you draw.
- You can choose the type of pencil or pen and start drawing on the document or picture in your Mac.
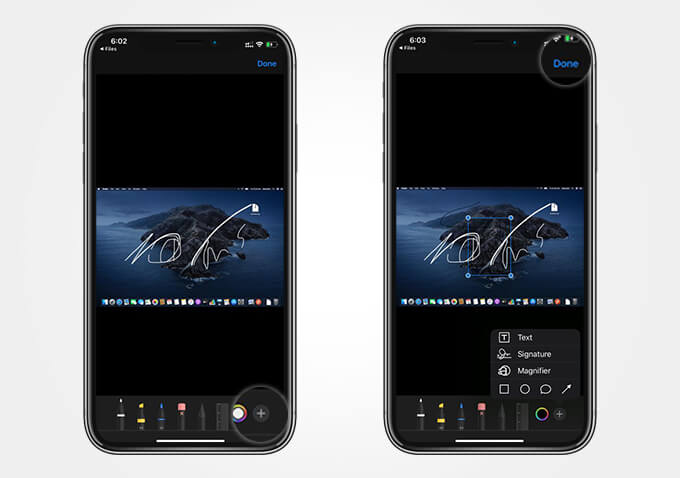
- The drawings and changes will be effective on your Mac screen instantly. You can even place the elements on PDF using your iPhone/iPad as well as the trackpad in your Mac.
- Tap the “+” icon on the right bottom corner to add a signature or magnifier elements on the PDF document.
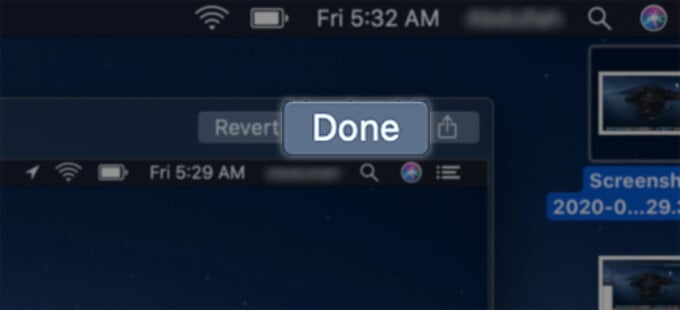
- Tap “Done” when you finish drawing.
- Save the modified PDf on your Mac.
You markup a PDF or markup photo on iPhone or iPad, fro your Mac and instantly save them to your Mac itself.
Also Read: How to Sign A PDF on Mac Quickly
Use Continuity Sketch to Draw on Mac Using iPad
In case you are unaware, your iPad comes with the inbuilt Apple Sketch which you can use to scribble and draw whatever you want. Even though you can attempt drawing sketches on your Mac, the trackpad has its limitations. The Continuity Sketch feature in your Mac can import sketches from your iPad. Here is how to draw a sketch using your iPad and import it to your Mac.
- Keep both your Mac and iPad using the same Apple ID on the same Wi-Fi network.
- Open a file, a document, or even start composing a mail using the Mail app.
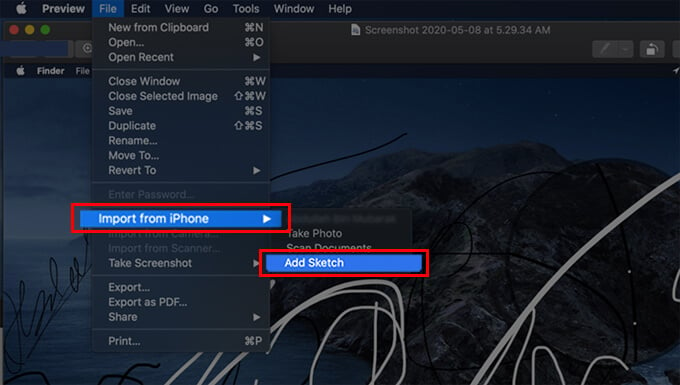
- Click on File from the menu bar on top.
- Go to Import from iPhone/iPad > Add Sketch.
- A sketching interface will appear now on your iPad.
- Draw using your iPad and Apple Pencil.
- Tap “Done” after finishing the drawing.
- Find the drawn sketch imported on your Mac.
- You can either add it to a document or mail or save the sketch as an image on your Mac.
You can only add a sketch on your Mac from the iPad and supported iPhone models. If you are having an iPhone, you can only draw on any documents or images with the continuity markup feature.
Add Signature to Documents on Mac Using iPhone or iPad
We have previously discussed various methods to add a signature to PDF and documents in Mac using your Mac’s trackpad. In case you find the trackpad a little uncomfortable, you still can add a signature to the documents using your iPhone or iPad. Here is how you can add a signature from your iPhone or iPad to the documents on Mac.
- Connect both your Mac and iPhone/iPad to the same Wi-Fi network.
- Select the file you want to add signature on your Mac.
- Press the space bar to open the file in the Preview app.
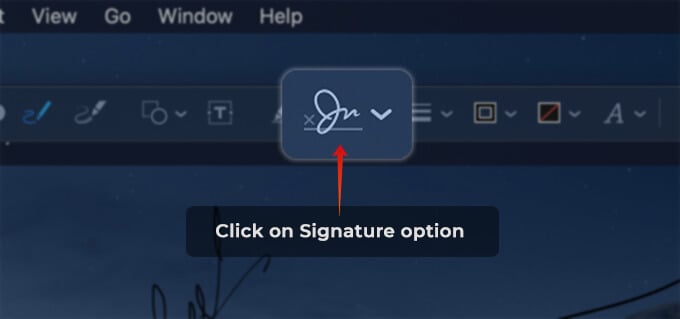
- Click on the markup tool button.
- Now, click the signature icon to add a signature to the PDF or document on your Mac.
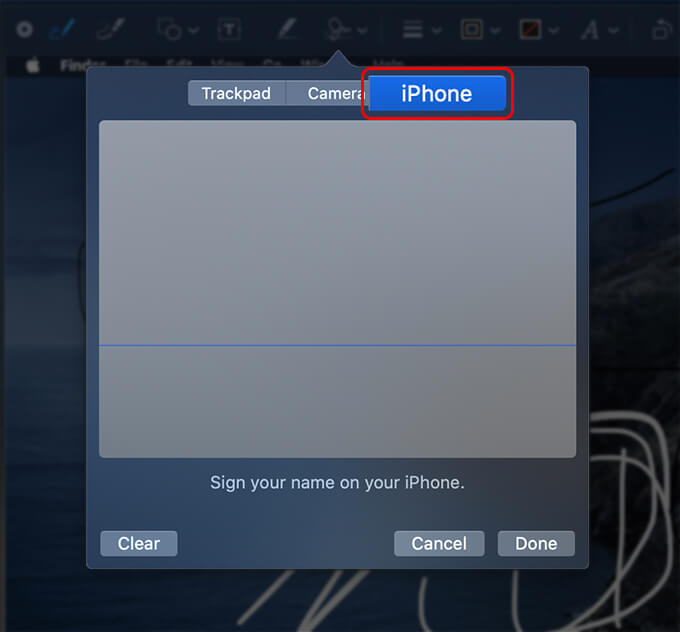
- Choose the iPhone/iPad tab from the signature popup menu.
- Now check your iPhone or iPad to see the signature drawing window.
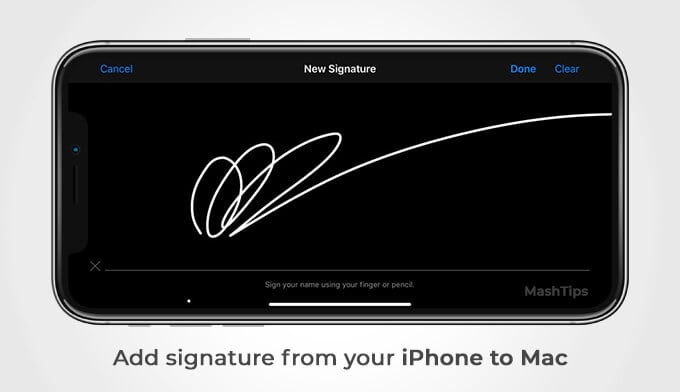
- Draw your signature using the finger.
- Tap “Done” on iPhone.
- Click “Done” on your Mac when you finish drawing the signature and add to the document.
- Save the PDF or document after inserting the signature.
If you have an iPhone or iPad, you can easily edit documents and draw over the pictures on your Mac easily. The only condition is to use the same Apple ID on all your devices and connect all to a common network. If you have found this helpful, have a look at our iOS guide section and Mac tutorials to know more hidden features.